NOTE: Like the Star TSP100 model, the Star TSP100III can also provide wireless receipt printing by connecting directly to your internet router with an ethernet cord. For more information on this LAN setup, click here.
Connecting your printer
- Connect the power cord to your printer and an electrical outlet.
- Turn on the printer and wait for the blue Ready light to become solid.
Inserting your paper roll
- To open the printer's lid, push the latch on the right away from you and lift the lid upwards.
- Insert the paper roll in the orientation below.
- Pull the paper out past the cutter at the front of the printer.
- Push the lid down to snap the latch shut
Connecting your printer to your wireless network
The simplest way to connect your printer to your wireless network is by WPS. If your router does not support WPS, you can connect by the AP network mode.
Connect by WPS
- On the back of your printer, press and hold the red PAIR button. The blue Ready light in front of the printer will start blinking.
- On your router, press the (WPS) button.NOTE: Step 1 and 2 need to be done within 30 seconds of each other.
- Once the connection between your printer and router is established, the blue Ready light will be solid and your Network Configuration and Current IP Parameters Status will print automatically.NOTE: If a connection is not established after repeating steps 1-3, refer to Star Micronic's FAQ - Cannot connect to network article.
- Under Current IP Parameters Status, take note of the IP Address. This is your printer's new dynamic IP address.
Connect by AP network mode
Connecting your printer to your computer by the AP network mode involves:
1. Printing your Network Configuration and Current IP Parameters
- To turn off your printer, press the power switch on the left.
- While your printer is off, press and hold the FEED button on the front of your printer.
- Still holding the FEED button, turn on your printer using the same power switch.
- Once your Network Configuration and Current IP Parameters Status print successfully, release the FEED button.
- Under Network Configuration, take note of the SSID. This is you printer's name.
- Under Current IP Parameters Status, take note of the IP Address. This is your printer's default static IP address.
2. Setting your wireless LAN settings
- Click Connect.
- From the left menu, click Login.
- In the new Authentication Required window, enter the following:
- User Name: root
- Password: public
- Click OK.
- To close the new security window, click Cancel.
- From the left menu, click WLAN Settings.
- Select Infrastructure Mode and enter the following:
- SSID: your Wi-Fi network's name.
- Security: WPA2/AES.
- Security Key: your Wi-Fi network's password.
- Click Submit.
- From the left menu, click the Save section and select the following:
- select Save > Configuration printing > Restart device.
- click Execute.
- From the automatic printout, Under Current IP Parameters Status, take note of the IP Address. This is your printer's new dynamic IP address.
Installing your printer driver on your computer
- For Windows 7 and later, click here to initiate the download of your printer driver to your computer.
- To save your printer driver, click OK.
- From your browser's Downloads folder, double-click your tsp100 file to locate it in your computer.
- From the tsp100 folder, double-click Autorun.
- From the Compressed (Zipped) Folders windows, click Extract All > Extract.
- From the tsp100 folder, double-click Autorun.
- From the new TSP100 futurePRNT window, click Installation > I Accept.
- From the new User Account Control window, click Yes.
- From the new Install Shield Wizard window, click Next > Next > Next > Install.
- Deselect the Launch Star Cloud Services Web site and click Finish.
Adding your printer to your computer
- To open your LAN & Bluetooth Setup Tool, search for LAN in the bottom left search field of your screen.
- Click LAN & Bluetooth Setup Tool.
- From the new User Account Control window, click Yes.
- In the new LAN & Bluetooth Setup Tool window, click Discovery.
- Once your Star TSP100III and it's dynamic IP address is listed, highlight your printer and click Print Queue
- From the new Print Queue window, select the Print Test checkbox and click Apply.
Setup The COM port
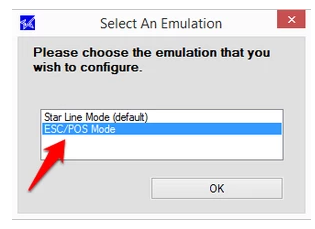
- Open the Star Configuration Utility Tool
- Select ESC/POS Mode
3. Select Serial Ports
4. Click on Add Port. In the Virtual Serial Port Name field enter COM11 (you can usually use anything from COM9 up to COM13 if the one you want to use isn't free). Make sure the Error Action checkbox is set to Stop Printing and click OK.
From the Startup Type dropdown menu select Automatic and then click on Start. The Status should change from Stopped to Running.
Click Apply Changes. Click Check Health.
If this works the screen will show a message saying Check Health Completed Successfully and a small piece of paper will feed through the printer saying
Test Printing ...
Serial Port Emulator
Port name: COM11 (or whatever you have set)
Emulation: ESC/POS
If it fails the system will show a message saying Check Health Failed!
Once the check health is working correctly click Close.
Change The Terminal Settings In Phorest
Go to Manager > Settings > Point Of Sale > Device
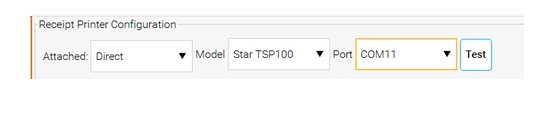
Under the Receipt Printer Configuration make sure you select Direct next to Attached, then select Star Tsp 100, then select the COM port which you have assigned to the receipt printer.
Here is an example:
Make sure that the Purchase Receipt Mode is setup also:

It is best to have Receipt Print Optional enabled so that the salon will be prompted with a Print Receipt button when the change due screens. This saves paper and also prevents paper being printed if the client does not want a receipt.
Once these settings have been set click Save on the bottom right of the screen and Restart Phorest
To make sure the printer and cash drawer are working correctly do the following:
- Go to Manager > Sales. Select a transaction from any time. Then click on Receipt, then Print. This should print a copy of the receipt on the Star TSP 100.
- Go to Manager > Cash Up. Click on Open Cash Drawer at the bottom of the screen and this should pop the drawer.
Formatting your computer settings
- Go to Start > Control Panels > View devices and printers. NOTE: If you are using a Windows 8 or 10 version, right-click the Start Menu instead of doing a left-click.
- Right-click the Star TSP100III and select Printing Preferences.
- Click the Advanced button and set the Paper Size to 72 x Receipt.
- Click OK > OK
- Right-click the Star TSP100III and select Printer properties.
- Click Preferences > Advanced and set the paper size to 72 x Receipt.
- Click OK > OK.
- Click the Advanced tab.
- Click Printing Defaults and set the paper size to 72 x Receipt.
- Click OK > OK.
- Click the Device Settings tab and set the following:
- FRICTION: 72 x Receipt.
- Page Cut Type: Partial Cut (for receipts to cut automatically).
- Document Cut Type: Partial Cut (for receipts to cut automatically).
- Peripheral Unit Type: Cash Drawer (for the cash drawer to open when you print a receipt).
- Peripheral Unit 1: Document Top (for the cash drawer to open when you print a receipt).
- Peripheral Unit 2: Document Top (for the cash drawer to open when you print a receipt).
- Click OK.
- Right-click the Star TSP100III and select Default Printer (optional). Ensure that the green checkmark appears next to the printer.
Formatting your Firefox browser settings
Formatting your Firefox browser settings involves configuring the:
About:config settings
- Open your Firefox browser.
- In the address bar, enter about:config
- Click the I accept the risk! button.

- In the Search bar, enter margin
- From the Preference Names below, double-click their Value columns > enter 0 > click OK.
- print.print_margin_bottom
- print.print_margin_left
- print.print_margin_right
- print.print_margin_top
- print.print_unwriteable_margin_bottom
- print.print_unwriteable_margin_left
- print.print_unwriteable_margin_right
- print.print_unwriteable_margin_top
- In the Search bar, enter header
- From the Preference Names below, double-click their Value columns > delete the values > click OK:
- print.print_headerleft
- print.print_headerright
- In the Search bar, enter footer
- From the Preference Names below, double-click their Value columns > delete the values > click OK:
- print.print_footerleft
- print.print_footerright

- In the Search bar, enter print_printer
- From the Preference Name print_printer, right click its Value column > click Reset.

- From the Search bar, enter print.save_print_settings
- If you print from Firefox to multiple printers, from the Preference Name print.save_print_settings, double-click the Value column to set it to false instead.
- Close the about:config Firefox tab.
Page setup
- Open your Firefox browser.
- Click File > Page Setup.
- Click the Margins & Header/Footer tab.
- In the Margins section, enter 0 in all the fields.
- In the Headers & Footers section, select blank from all the drop-downs.
- Click OK.
Print prompt properties
- From the main menu of your Retail account, click Reports > Totals.
- From the ID column, click a blue Transaction ID.
- Click the grey Print Receipt button.
- From the new Print window, click Properties.
- From the new Properties window, click Advanced...
- From the new Advanced Options window, make sure the Page Size drop-down menu is set to 72mm x Receipt.
- Click OK > OK > OK. You should have a successful receipt and your computer should be official setup for wireless receipt printing!